Feeds:
Posts
Comments

Posts Tagged ‘herbs’

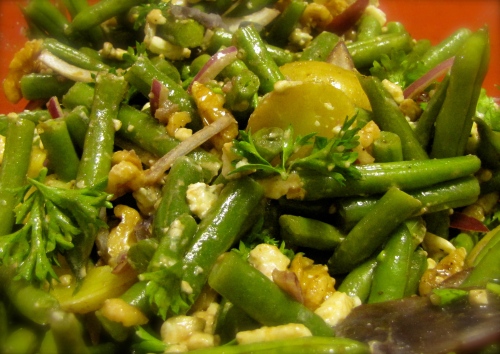
Yum. I made this dish for the first time few nights ago, and I am so happy with how well it turned out. Crunchy green beans and walnuts, combined with pungent blue cheese and red onion, make a wonderfully rich and savory salad. I served this as a side to a great (and garlicky) pot of healthy winter vegetable soup. The meal was a resounding success. Again, yum.

Green Bean and New Potato Salad

Ingredients

  • 1 pound green beans, chopped into 2″ pieces
  • 2-6 golden and purple new potatoes*
  • about 1/4 red onion, sliced thinly
  • 1/4 cup raw walnuts (or roasted, if you prefer), roughly chopped
  • about 5 oz. blue cheese, crumbled
  • 1/4 cup fresh parsley, coarsely chopped
  • 2 Tbs olive oil
  • 1 Tbs balsamic vinegar
  • salt and pepper, to taste

*For this version, I just threw in two little potatoes for fun and a bit of color. Next time, I would use about six–they were good! On the other hand, I think you could easily leave them out and make a strictly green bean salad that is equally delicious.

Directions

  1. Thinly slice the potatoes. Add them to the bottom of a steamer with already boiling water.
  2. After about 8 minutes, add the green beans. Continue to boil for another 6 minutes or so. Let cool.
  3. While the beans and potatoes are steaming, prepare the onions, walnuts, and parsley. Thinly slice the onion and coarsely chop the walnuts and parsley, mixing all together in a salad bowl.
  4. Once the beans have cooled a bit, add them to the bowl. Drizzle olive oil to coat, with balsamic vinegar, salt and pepper, to taste. Toss all ingredients together to mix.
  5. Serve immediately, or chill for a bit to let flavors meld.
© 2012, Juniper Stokes

© 2012, Juniper Stokes

The Soup

When I prepared the soup to go with this meal, I really just threw whatever vegetables I had on hand in a bit pot with a lot of garlic and herbs. I didn’t take any pictures or write anything down because I wasn’t expecting an amazing soup–just a good healthy soup to fulfill my winter-weather cravings. But of course the soup ended up being ridiculously amazing, and my cousin’s wife (who was present at the meal) has been asking me for the recipe. So, for her and anyone else who wants to stick to our overall meal plan, here is my best guess for how to recreate my stellar soup.

Ingredients

  • 1 butternut squash, chopped
  • 1 turnip, chopped
  • 1/2 white/golden onion, chopped
  • 4 new potatoes, quartered
  • 6 baby bella mushrooms, quartered
  • 1//4 cup green beans, chopped
  • 1 cup frozen kale
  • 1 head garlic, coarsely chopped
  • 1/3 cup loosely packed fresh parsley, chopped
  • 1/2 tsp dried sage
  • 1/2 tsp dried thyme
  • 1/2 tsp dried rosemary
  • 1 Tbs olive oil
  • 1 quart broth/water*
  • splash white wine
  • grated parmesan to top

*I only had about half a box of veggie bouillon on hand, so I added that and used water to cover the rest of the vegetables. I honestly think water works just as well as bouillon in any well-seasoned soup.

Again, I just threw whatever I had in a big pot and hoped for the best. The soup was great, but next time I might decide to leave out the mushrooms. Or to add tomato. Feel free to play with whatever you have on hand. The key ingredient in this soup is actually the fresh parsley–it made a huge difference in the flavor. And of course the wine. As my regular readers will know, I add wine to everything I cook. I guess it’s my good luck charm.

Directions

First, prepare the squash by roasting it at 450 degrees for about 40 minutes. At this point, the squash should be easy to remove from its skin, but not yet cooked all the way through. (Remember to save the seeds! Perfectly Cooked Pumpkin Seeds)

Next, set the potatoes to boil. Like squash, potatoes take quite awhile to cook through, so these extra steps make a difference in how quickly the soup is ready.  Allow the potatoes to boil until they are just over halfway cooked (about 12 minutes) and remove from heat.

While the squash and potatoes are cooking, begin to prepare the rest of the vegetables. Once everything is chopped and ready to go, add the onion, garlic, herbs, salt, pepper, and olive oil to the bottom of a big pot. Sauté these ingredients together over medium heat until the onion begins to turn clear.

Next, add the mushrooms, turnip, beans, and potatoes, and continue to sauté for another 8 minutes or so.

By this time, the squash should be done roasting. Turn the heat to low and let the veggies continue to cook gently while you prepare the squash. Once the squash is ready, turn the heat back up to medium, add the squash, and continue to cook everything together for another 5 minutes.

At this point, all the veggies should be just about cooked through and steeped in herby goodness, so add the broth and water. Bring the liquid to a boil, reduce heat, and stir in the kale. Continue to simmer for another 12 minutes.

Next, stir in the fresh parsley, and continue to simmer for another 5 minutes or so.

The last step is to turn off the heat and stir in a splash of wine. Top with salt, pepper, and parmesan to taste.

The bright orange squash and dark green kale make this quite a pretty soup, and with all the garlic and vitamin-packed vegetables, it’s incredible healthy and perfect for warming up during winter. I’ll definitely add a picture next time I make this!

Read Full Post »

Phew! In the past week, I have packed up my life and traveled across five states to move to a new city, begin a new job, and start a new year (yesterday was my birthday!). I’ve been busy. I meant to post this awesome soup recipe before the move, but as it often does, time slipped away into a frenzy of packing and good-byes. I hope this posting catches you in time to use the last of your own garden and farmers market harvests.

A little while ago, I posted a photo of my  Autumnal Equinox harvest, with promises of recipes to follow. One of my favorite recipes to come out of the harvest was a huge pot of soup. Inspired by the veggies of the harvest, I decided to try and make a soup as close to entirely garden-grown as possible. I threw in tomatoes, carrots, zucchini, yellow squash, green beans, fresh herbs, and dried herbs (from last year’s harvest) all from the garden. Garlic, onion, and a few other basics had to be bought, and I couldn’t resist adding fresh farmers market corn. I topped this soup with a bit of semi-sweet white wine and Parmesan and enjoyed the flavors of late summer.

And I should mention that this recipe makes a huge pot of soup. My original plan was to have leftovers to freeze, so I could enjoy the flavors of summer when I need a pick-me-up this winter. Alas, the soup was just too good, and we all ate up the entire pot within days.

Ingredients:

  • 1 large zucchini, sliced or chopped
  • 1 large yellow squash, sliced or chopped
  • 1 large carrot, sliced or chopped
  • about 6 small-medium tomatoes
  • 1/2 c green beans, chopped
  • 1 cob corn
  • 1 small white onion, chopped
  • 4 cloves garlic, minced
  • about 2 cups lightly packed fresh mixed herbs (rosemary, basil, parsley, thyme, marjoram), chopped
  • 1 tsp each dried oragano and basil
  • 1 Tbs olive oil
  • 3 quarts veggie broth or water
  • heavy splash semi-sweet white wine
  • salt and pepper to taste

As with most things I cook, ingredients are fluid–a bit extra on the herbs, a bit less of the squash–these changes really won’t effect the overall results too much. Still, I have to say the  ingredients and ratios I used for this particular soup were amazing, so I’ll throw in a few pictures to help you more accurately estimate the amounts.

Directions:

garlic cloves © 2012, Juniper Stokes

First, sauté the onion and garlic in the olive oil, adding the dried herbs and a bit of salt. I like to keep the soup pretty low fat, so I add water rather than more oil to prevent sticking. Once the veggies are added, they release enough water that you shouldn’t have any more sticking problems.

After sautéing the garlic, onions, and herbs for a few minutes, add the carrots and cook for another 4-5 minutes.

I used 2 fat carrots from the garden instead of one big one © 2012, Juniper Stokes

Then add the squash, zucchini, corn, and beans, and continue to sauté for another 5 minutes or so.

use a knife to take fresh corn kernels off the cob © 2012, Juniper Stokes

squash and zucchini © 2012, Juniper Stokes

veggies in a pot! © 2012, Juniper Stokes

Once the vegetables are just beginning to become tender, add the tomatoes and cook for a few more minutes.

garden tomatoes © 2012, Juniper Stokes

Next, throw in the fresh herbs, followed by the broth or water.

rosemary, parsley, marjoram, thyme, and basil © 2012, Juniper Stokes

I like my vegetable soup to be very brothy, so add a bit less liquid  for a chunkier soup. With the garlic, onion, herbs, and surplus of veggies, you should be fine sticking to water. A broth will simply add a bit more immediate flavor if you don’t have time to let the flavors set. When I made this soup, I compromised and used 1 cup veggie bouillon broth, with the rest plain old purified water. It worked.

Simmer the veggies in the liquid long enough to let the flavors merge, about another 25-30 minutes. I think a bit of wine makes most things better, so I like to stir in about a 1/4 cup semi-sweet white wine right after turning off the heat at the end.

Top with parm (totally optional), salt, and pepper and serve immediately, or for even more flavor let the soup sit overnight. Yum.

late summer garden soup © 2012, Juniper Stokes

And in case you’re wondering, my new home is in Boulder, CO, and I just turned 32. Enjoy the soup!

Read Full Post »

After having so much success making Summer Squash Salad, Greek Style, I decided to experiment with some different flavors. This version of squash salad was basically born from three things I have in the garden: squash, Thai chilies, and Thai basil.

my first Thai chili peppers © 2012, Juniper Stokes
They go from green to purple, and are ready at red!

It’s my first year growing Thai chilies, and I’m happy to be having a lot of success here, as well. And I always like to have at least one pot of Thai basil growing in addition to traditional basil. (Thai basil has a bit of a spicy-sweet quality to it, and is wonderful in Vietnamese summer rolls.) And as I’ve mentioned before, I have plenty of summer squash to play with.

I also wanted to experiment with some new yuzu vinegar I’d just bought:

yuzu vinegar, © 2012, Juniper Stokes

I first became familiar with yuzu during my stay in Tokyo. The fruit itself is not eaten plain, but its juice and rind have a wonderfully unique citrus flavor, something between a grapefruit and lime and mandarin orange all mixed together.

Yuzu is commonly used to enhance Japanese dishes, and I was happy to find this vinegar. Still, I would have preferred a bit more yuzu essence in the salad, so if you’re lucky enough to live somewhere with access to fresh yuzu, add the juice and zest to the salad, as well.

Ingredients

  • 1 yellow summer squash
  • 1 zucchini
  • 2 Tbs yuzu vinegar
  • 1/4 cup olive oil
  • 2 Tbs lime zest (or yuzu if you’re lucky enough to have one)
  • 1 clove garlic, minced
  • 1 Tbs chopped parsley
  • 1 Tbs chopped Thai basil
  • 1 Thai chili (or less if you’d like–they’re strong!)
  • 4 chopped green onions

Directions

First, I wisked together the olive oil, vinegar, garlic, lime zest, and Thai chili. Then I added the zucchini and squash, and let sit overnight.

For this salad, I decided to skip trying to make the squash and zucchini into fancy ribbons, but I did at least use one of each color:

one small zucchini and one small yellow squash, sliced © 2012, Juniper Stokes

I topped the salad with Thai basil, parsley, and green onions right before serving.

spicy squash salad © 2012, Juniper Stokes

Another healthy, mostly raw meal  . . . with a kick!

Read Full Post »

Anyone who has ever grown zucchini or other types of summer squash knows that come late August, it’s on. It’s time to figure out how to eat, use, and give away 3-5 pounds of squash a day for roughly an entire month. Personally, I love this challenge. The kitchen is where I am able to release a lot of my creative energy, and I find that more often than not, challenges and restrictions lead to innovative new ideas and recipes that I never would have discovered otherwise.

So far this squash season, I’ve already made many different squash sautés and a great veggie soup, I’ve shredded and frozen bags of zucchini for savory pancakes this winter, and I’ve had many a veggie barbecue involving squash (okay, my dad did the actual barbecuing, but I created some great marinades).

One of my favorite new ways to use up summer squash was originally based on a recipe from Vegetarian Times, which you can check out here: Greek Zucchini Salad Recipe | Vegetarian Times.

I’ve spent quite a bit of time in Greece, and I have to say Greek food is one of my favorite cuisines. This recipe really captures the flavors of Greece in the summer, with lemon, mint, olive oil, and feta flavoring the squash. As a bonus, I could also look to my own garden for the mint and parsley. The recipe is really pretty good as it’s written on the VT website, although I prefer to use 1/2 cup onion rather than an entire cup, as the recipe suggests.

Check out the recipe on their website, or here:

Greek Zucchini Salad from the Vegetarian Times

Ingredients:

  • 3 Tbs. lemon juice
  • 2 tsp. grated lemon zest
  • 1 minced garlic clove
  • ⅓ cup olive oil
  • 2 medium zucchini or squash, (somehow) peeled into thin ribbons
  • 1 medium sweet onion (I only use 1/2 onion)
  • ½ cup crumbled feta cheese
  • 2 chopped green onions
  • 1 Tbs. chopped fresh mint
  • 1 Tbs. chopped fresh parsley

Directions:

Stir together lemon juice, lemon zest, garlic, and olive oil in large serving bowl. Add zucchini and onion, and toss to coat. Cover and marinate overnight, or up to 2 days. Sprinkle with feta, green onions, mint and parsley just before serving, as well as salt and pepper to taste.

This recipe is really pretty easy, but my kitchen is in no way equipped with fancy tools, and thinly slicing squash and zucchini into pretty ribbons turned out to be a bit more difficult than I would have liked. I tried using a simple vegetable peeler for one salad, which left me with a few pretty ribbons and a lot of messy globs. In the end, using a food processor to thinly slice the squash worked well.

From there, I marinated the squash, lemon juice and zest, olive oil, onion, and garlic overnight, then topped the dish with chopped mint, parsley, green onion, and feta right before serving. The salad was a complete hit.

Greek Squash Salad © 2012, Juniper Stokes

I love that this recipe uses raw zucchini. Though I don’t tend do well eating completely raw, I do try to eat 50-80% raw. The healthy enzymes and unaltered vitamin and minerals in raw foods are healing for our bodies on many levels. Though the feta means this salad is officially neither raw nor vegan, it still packs a super healthy punch. And the feta is just soooo goooood.

Inspired by my success with this recipe, I decided to take the flavors to Asia. Asian version coming soon!


Read Full Post »

Well, pumpkin blossoms, to be more accurate. This year our pumpkin plant is out of control. Its vines must run at least 16 feet along our garden fence, and everyday we see more beautiful bright orange blossoms opening and begging for attention.

pumpkin blossom in the garden © 2012, Juniper Stokes

Eventually I noticed that only some of these blossoms were turning into actual pumpkins. I knew squash blossoms were edible, but hesitated to gather them for fear that I would be stealing one of the few blossoms that actually bore fruit. So, I did a bit of research. It turns out there are two types of blossoms on the same plant, male and female, and only the female blossoms bear fruit! So, how do you tell the difference? The female blossoms will already have a miniature version of the squash at their base. Check out pictures here:

Male and female squash blossom pictures.

I’ve also noticed that male blossoms tend to stick straight up along the vine, while females will more often aim downward.

Since learning to gather only male blossoms, I have been going squash blossom crazy this summer! I add them to sautés and soups, put them in quesadillas, steam them and serve lightly salted, and of course, stuff them. I have perfected my stuffed quash blossom recipe this summer, so here is the step-by-step to making amazing stuffed squash blossoms.

Ingredients

  • about 8 squash or pumpkin blossoms
  • 1 egg
  • 1 cup fresh mixed herbs, chopped
  • 3 oz goat cheese
  • 1/4 cup shredded mozzarella
  • 1 tablespoon olive oil

To be honest, I’m a very intuitive cook and never really measure anything. But if you stick to these basic ingredients and ratios, with a dose of your own intuition, you will end up with something delicious.

Gathering the Blossoms

Now that you know how to tell male from female blossoms, it’s time to gather them. Every few days we’ll have several blossoms blooming at once, and  I generally wait for one of these days to do my gathering. It’s best to pick the blossoms in the morning, when they are in full bloom, as they tend to wilt and close down later in the day. And, the blossoms only bloom for a day, so don’t expect to go back for the same blossom the next day. Also, make sure to leave a few blossoms for pollination–the girls do need a few boys!

To pick each blossom, simply cut the  stem an inch or so below the blossom. Wear gloves or a long sleeved shirt if you have sensitive skin, because squash and pumpkin plants are prickly.

Preparing the Blossoms

It’s easiest to prepare the blossoms immediately after picking them, when they are still open. They will close up after a few hours, which makes preparation more difficult, though still doable.

pumpkin blossoms immediately after picking © 2012, Juniper Stokes

pumpkin blossoms later in the day © 2012, Juniper Stokes

After gently washing the blossoms, reach in and pinch off the stamen. It’s fine to leave the stems on because they are completely edible, and are actually one of my favorite parts once cooked!

Making the Filling

To make the filling, first add the egg to your mixing bowl and stir with a fork to break the yoke.

Next, stir in the chopped herbs. I’ve tried all different combinations here, usually some variation of chives, basil, parsley, and tarragon, and every time has been delicious. My favorite by a margin though was 2/3 cup chives and 1/3 cup tarragon. Amazing.

Now stir in the cheese. I like to use coarsely chopped goat cheese and mozzarella, though feel free to experiment with your own favorites.

Once all the ingredients are mixed, the filling should have a thick, malleable consistency.

the filling © 2012, Juniper Stokes

Stuffing the Blossoms

Now for the fun part. First, prepare a baking dish by placing a small amount of olive oil in the bottom. You will gently coat the blossoms in olive oil as you add them to the dish. Next, preheat the oven to 350 degrees.

Take the first blossom and gently open its petals. you can use a spoon to scoop in the filling, but I find it’s easier just to get messy and use my fingers. I grab a small bit and gently press it into the blossom until it’s almost full, then gently close the petals again, pinching them together at the top.

Once the blossom is stuffed, roll it in the olive oil and line it up in the baking dish.

Baking

Once the blossoms are ready, bake at 350 degrees for 15-20 minutes. You’ll want the filling to cook, but the blossoms to retain their delicate taste, so make sure to take them out before the blossoms turn brown.

YUM © 2012, Juniper Stokes

Now you’re ready to serve. Enjoy!

Read Full Post »