Feeds:
Posts
Comments

Posts Tagged ‘garden’

Well, it’s the day after Thanksgiving and I am happily stuffed after revisiting some of yesterday’s leftovers for breakfast this morning. I’m at home visiting my parents in Washington State, and I’m happy to say that our Thanksgiving meal was seasonal, local (with pumpkin, squash, carrots, and herbs from our garden), and totally vegetarian!

My family has been pescatarian for years, and I don’t even remember the last time we attempted to have a turkey for Thanksgiving. Though stuffing a turkey for this holiday has become an American tradition, our family has found alternative, more sustainable, turkey-friendly, and equally enjoyable ways to celebrate. We still stick to the classics for our sides–cranberry sauce, mashed potatoes and veggie gravy, brussel sprouts or green beans, corn, sweet yams–these are all very easy to make vegetarian. But for the main event, rather than stuffing a turkey, we stuff a pumpkin from our garden. Some years, we use a regular bread crumb stuffing, while other years, we switch to wild rice for a local twist. Either version gives us the satisfaction of the Thanksgiving stuffing tradition, without the added cruelty. And let’s be honest, the more well-known veggie alternative, Tofurkey, is not that satisfying or healthy.

I know it’s a bit late for recipes, but I thought I’d at least share this year’s menu with everyone, with hopes of giving other veggies some inspiration around this time of year. And as a bonus, this menu is almost entirely gluten free.

A Vegetarian Thanksgiving Menu

Appetizer

  • Goat cheese torte with pesto and sun dried tomatoes

Sides

  • Simple green salad with cranberry gorgonzola dressing
  • Organic homemade cranberry sauce with ginger and hot chillies
  • Mashed potatoes with homemade veggie gravy
  • Roasted green beans with red onion
  • Caramelized mushrooms and onion in a rich butter-wine sauce
  • Sweet yams with maple syrup and spices

The Main

  • Individual acorn squash cups stuffed with wild rice and herbs

Dessert

  • Pumpkin pie with bourbon whipped cream

Drinks

  • Local sparking and red wine, as needed ;)

The only dish that wasn’t homemade this year was our appetizer, a goat cheese torte from Trader Joe’s. We served this with rice crackers and sparkling wine from the Mountain Dome Winery, my favorite local winery for the sparkles.

Mountain Dome sparkling wine and Trader Joe’s cheese torte © 2012, Juniper Stokes

A simple side salad with organic baby greens, tomatoes, and green onions, topped with a gorgonzola cranberry dressing from Trader Joe’s, gave the meal a bit of freshness.

simple side salad © 2012, Juniper Stokes

The green beans were supposed to be roasted in bundles with kitchen twine, though we later realized we had the wrong kind of twine and cut if off before actually roasting these beautiful bundles.

green bean bundles © 2012, Juniper Stokes

Homemade gravy with olive oil, flour, and veggie bouillon–delicious and vegan!

vegan gravy © 2012, Juniper Stokes

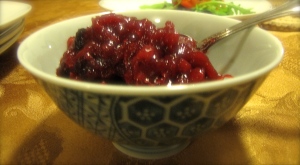
Dad bought organic cranberries and spiked them with ginger and Thai chili peppers from our garden–amazing. I’ll never serve canned again!

homemade cranberry sauce © 2012, Juniper Stokes

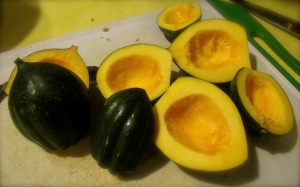
This year, we decided to use acorn squash rather than pumpkin for our main event. After a bit of an odd growing season, my parents ended up with several extra small but still delicious acorn squash from their garden, perfect for individual servings.

tiny acorn squash © 2012, Juniper Stokes

Thanks to their new green house, we were able to season the wild rice stuffing with herbs and carrots from the garden, as well.

stuffed acorn squash with wild rice © 2012, Juniper Stokes

All together, it was a wonderful, healthy, local, vegetarian feast!

Thanksgiving dinner © 2012, Juniper Stokes

I can’t believe I forgot to take a picture of the pumpkin pie (made with a garden pumpkin) with bourbon-agave whipped cream! It was delicious, and I must have been a bit too excited to eat it . . .

I hope these menu ideas help, and if anyone is in desperate need of a recipe, let me know! I’m happy to help.

Happy Thanksgiving! © 2012, Juniper Stokes

Read Full Post »

Time for another recipe! I’m sure many of you have had the experience of making so much of an amazing dish that you end up with amazing leftovers. But sometimes, no matter how amazing the leftovers are, you’re just not in the mood for the same dish twice. When this happened to me this summer, I got creative and turned last night’s dinner into a totally new breakfast.

The Dinner

As I’ve discussed in previous posts, our garden was overflowing with squash and tomatoes this year. One way I enjoyed eating up these veggies was making a chunky, fresh pasta sauce. I’ve never been a fan of using a lot of canned ingredients, so I like to make my own “sauces” using veggies and spices, which I toss with brown rice pasta.

I’m not overly strict, but I am basically wheat-free, and brown rice pasta hits the spot when one of my carb cravings comes along. I like Tinkyada brand pasta, though I’m sure there are many good brands.

my favorite pasta

These pastas have a great energy saving cooking method, too. Simply boil for 5 minutes, and let sit covered for another 20 minutes. I find that it’s almost impossible to overcook brown rice pasta, so its perfect for multi-tasking and making a sauce at the same time.

Chunky Veggie Pasta Sauce

Anyway, back to the sauce . . . as with most of my cooking, I use what’s seasonal and available. Here is what I put in the sauce:

  • 1 large yellow squash, chopped
  • 5 small-medium tomatoes, chopped
  • 1/2 cup fresh corn kernels
  • 3 cloves garlic, minced
  • fresh and/or dried herbs (I used oregano, basil, and thyme, dried and fresh)
  • 1-2 Tbs olive oil
  • splash white wine (because, as I’ve said before, wine makes everything better)
  • salt and pepper to taste

This is a very general recipe. Basically, I just sauté a bit of garlic and herbs in olive oil, throw in a bunch of fresh veggies and herbs that I think are delicious, and splash some white wine on top before serving. I toss the “sauce” with the pasta (I put this in parentheses because it’s really more like sautéed veggies and liquid than sauce–but still delicious), top with parm, and serve. It makes a wonderful, easy, healthy, dinner.

Leftover Veggie Egg Bake

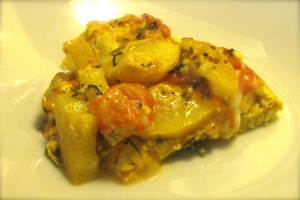
But let’s get down to the main event: using up the leftovers. The pasta sauce could’ve served four, but only two of us ate it, so we had leftovers. I didn’t feel like pasta two nights in a row, but I needed to use up all the food becuase the garden doesn’t wait! So, I decided to use the veggie pasta sauce to add some veg-power to our breakfast. I added some eggs and feta cheese (for a bit of fanciness), and ended up with a protien and veggie-packed morning meal.

Ingredients:

  • about 2 cups chunky veggie sauce (this is just what I had leftover–any amount would work)*
  • 2 eggs*
  • 1/4 cup feta cheese
  • salt and pepper to taste

*I used about a 1:1 ratio for cups of veggie sauce to eggs, and I liked the results. However this dish was very heavy on the veggies, and I would up the eggs for a more quiche-like dish. Also, if you’re using a sauce with more liquid, you also may want to up the egg ratio and cook for a bit longer, so the end result isn’t too soupy.

Directions:

  • Step 1: Preheat oven to 450°.
  • Step 2: Use a fork to stir the eggs, breaking the yokes, in a large bowl.
  • Step 3: Add the leftover veggies, feta, salt, and pepper, making sure the eggs coat everything thoroughly.
  • Step 4: Pour the egg and veggie mixture into a glass baking dish.
  • Step 5: Bake for 45 minutes to an hour. (45 minutes leaves a bit of liquid, while an hour should be enough to remove all the excess moisture for a firmer dish.)
  • Step 6: Let cool slightly, and serve!

veggie leftovers egg bake © 2012, Juniper Stokes

This breakfast, made from two eggs and leftovers, tasted like gourmet brunch. This is my favorite new method for all veggie leftovers and I highly recommend it. Enjoy!

veggie leftovers egg bake © 2012, Juniper Stokes

Read Full Post »

Phew! In the past week, I have packed up my life and traveled across five states to move to a new city, begin a new job, and start a new year (yesterday was my birthday!). I’ve been busy. I meant to post this awesome soup recipe before the move, but as it often does, time slipped away into a frenzy of packing and good-byes. I hope this posting catches you in time to use the last of your own garden and farmers market harvests.

A little while ago, I posted a photo of my  Autumnal Equinox harvest, with promises of recipes to follow. One of my favorite recipes to come out of the harvest was a huge pot of soup. Inspired by the veggies of the harvest, I decided to try and make a soup as close to entirely garden-grown as possible. I threw in tomatoes, carrots, zucchini, yellow squash, green beans, fresh herbs, and dried herbs (from last year’s harvest) all from the garden. Garlic, onion, and a few other basics had to be bought, and I couldn’t resist adding fresh farmers market corn. I topped this soup with a bit of semi-sweet white wine and Parmesan and enjoyed the flavors of late summer.

And I should mention that this recipe makes a huge pot of soup. My original plan was to have leftovers to freeze, so I could enjoy the flavors of summer when I need a pick-me-up this winter. Alas, the soup was just too good, and we all ate up the entire pot within days.

Ingredients:

  • 1 large zucchini, sliced or chopped
  • 1 large yellow squash, sliced or chopped
  • 1 large carrot, sliced or chopped
  • about 6 small-medium tomatoes
  • 1/2 c green beans, chopped
  • 1 cob corn
  • 1 small white onion, chopped
  • 4 cloves garlic, minced
  • about 2 cups lightly packed fresh mixed herbs (rosemary, basil, parsley, thyme, marjoram), chopped
  • 1 tsp each dried oragano and basil
  • 1 Tbs olive oil
  • 3 quarts veggie broth or water
  • heavy splash semi-sweet white wine
  • salt and pepper to taste

As with most things I cook, ingredients are fluid–a bit extra on the herbs, a bit less of the squash–these changes really won’t effect the overall results too much. Still, I have to say the  ingredients and ratios I used for this particular soup were amazing, so I’ll throw in a few pictures to help you more accurately estimate the amounts.

Directions:

garlic cloves © 2012, Juniper Stokes

First, sauté the onion and garlic in the olive oil, adding the dried herbs and a bit of salt. I like to keep the soup pretty low fat, so I add water rather than more oil to prevent sticking. Once the veggies are added, they release enough water that you shouldn’t have any more sticking problems.

After sautéing the garlic, onions, and herbs for a few minutes, add the carrots and cook for another 4-5 minutes.

I used 2 fat carrots from the garden instead of one big one © 2012, Juniper Stokes

Then add the squash, zucchini, corn, and beans, and continue to sauté for another 5 minutes or so.

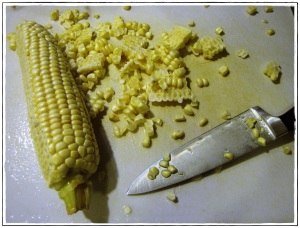
use a knife to take fresh corn kernels off the cob © 2012, Juniper Stokes

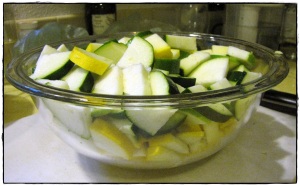
squash and zucchini © 2012, Juniper Stokes

veggies in a pot! © 2012, Juniper Stokes

Once the vegetables are just beginning to become tender, add the tomatoes and cook for a few more minutes.

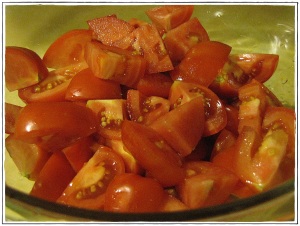
garden tomatoes © 2012, Juniper Stokes

Next, throw in the fresh herbs, followed by the broth or water.

rosemary, parsley, marjoram, thyme, and basil © 2012, Juniper Stokes

I like my vegetable soup to be very brothy, so add a bit less liquid  for a chunkier soup. With the garlic, onion, herbs, and surplus of veggies, you should be fine sticking to water. A broth will simply add a bit more immediate flavor if you don’t have time to let the flavors set. When I made this soup, I compromised and used 1 cup veggie bouillon broth, with the rest plain old purified water. It worked.

Simmer the veggies in the liquid long enough to let the flavors merge, about another 25-30 minutes. I think a bit of wine makes most things better, so I like to stir in about a 1/4 cup semi-sweet white wine right after turning off the heat at the end.

Top with parm (totally optional), salt, and pepper and serve immediately, or for even more flavor let the soup sit overnight. Yum.

late summer garden soup © 2012, Juniper Stokes

And in case you’re wondering, my new home is in Boulder, CO, and I just turned 32. Enjoy the soup!

Read Full Post »

After having so much success making Summer Squash Salad, Greek Style, I decided to experiment with some different flavors. This version of squash salad was basically born from three things I have in the garden: squash, Thai chilies, and Thai basil.

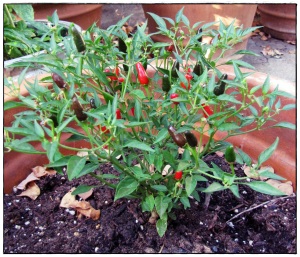
my first Thai chili peppers © 2012, Juniper Stokes
They go from green to purple, and are ready at red!

It’s my first year growing Thai chilies, and I’m happy to be having a lot of success here, as well. And I always like to have at least one pot of Thai basil growing in addition to traditional basil. (Thai basil has a bit of a spicy-sweet quality to it, and is wonderful in Vietnamese summer rolls.) And as I’ve mentioned before, I have plenty of summer squash to play with.

I also wanted to experiment with some new yuzu vinegar I’d just bought:

yuzu vinegar, © 2012, Juniper Stokes

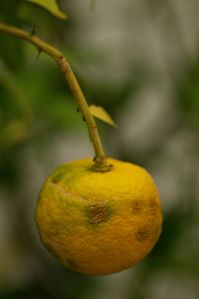
I first became familiar with yuzu during my stay in Tokyo. The fruit itself is not eaten plain, but its juice and rind have a wonderfully unique citrus flavor, something between a grapefruit and lime and mandarin orange all mixed together.

Yuzu is commonly used to enhance Japanese dishes, and I was happy to find this vinegar. Still, I would have preferred a bit more yuzu essence in the salad, so if you’re lucky enough to live somewhere with access to fresh yuzu, add the juice and zest to the salad, as well.

Ingredients

  • 1 yellow summer squash
  • 1 zucchini
  • 2 Tbs yuzu vinegar
  • 1/4 cup olive oil
  • 2 Tbs lime zest (or yuzu if you’re lucky enough to have one)
  • 1 clove garlic, minced
  • 1 Tbs chopped parsley
  • 1 Tbs chopped Thai basil
  • 1 Thai chili (or less if you’d like–they’re strong!)
  • 4 chopped green onions

Directions

First, I wisked together the olive oil, vinegar, garlic, lime zest, and Thai chili. Then I added the zucchini and squash, and let sit overnight.

For this salad, I decided to skip trying to make the squash and zucchini into fancy ribbons, but I did at least use one of each color:

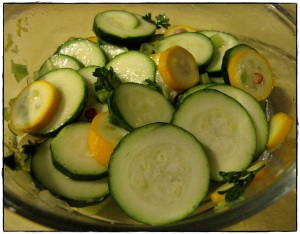
one small zucchini and one small yellow squash, sliced © 2012, Juniper Stokes

I topped the salad with Thai basil, parsley, and green onions right before serving.

spicy squash salad © 2012, Juniper Stokes

Another healthy, mostly raw meal  . . . with a kick!

Read Full Post »

Anyone who has ever grown zucchini or other types of summer squash knows that come late August, it’s on. It’s time to figure out how to eat, use, and give away 3-5 pounds of squash a day for roughly an entire month. Personally, I love this challenge. The kitchen is where I am able to release a lot of my creative energy, and I find that more often than not, challenges and restrictions lead to innovative new ideas and recipes that I never would have discovered otherwise.

So far this squash season, I’ve already made many different squash sautés and a great veggie soup, I’ve shredded and frozen bags of zucchini for savory pancakes this winter, and I’ve had many a veggie barbecue involving squash (okay, my dad did the actual barbecuing, but I created some great marinades).

One of my favorite new ways to use up summer squash was originally based on a recipe from Vegetarian Times, which you can check out here: Greek Zucchini Salad Recipe | Vegetarian Times.

I’ve spent quite a bit of time in Greece, and I have to say Greek food is one of my favorite cuisines. This recipe really captures the flavors of Greece in the summer, with lemon, mint, olive oil, and feta flavoring the squash. As a bonus, I could also look to my own garden for the mint and parsley. The recipe is really pretty good as it’s written on the VT website, although I prefer to use 1/2 cup onion rather than an entire cup, as the recipe suggests.

Check out the recipe on their website, or here:

Greek Zucchini Salad from the Vegetarian Times

Ingredients:

  • 3 Tbs. lemon juice
  • 2 tsp. grated lemon zest
  • 1 minced garlic clove
  • ⅓ cup olive oil
  • 2 medium zucchini or squash, (somehow) peeled into thin ribbons
  • 1 medium sweet onion (I only use 1/2 onion)
  • ½ cup crumbled feta cheese
  • 2 chopped green onions
  • 1 Tbs. chopped fresh mint
  • 1 Tbs. chopped fresh parsley

Directions:

Stir together lemon juice, lemon zest, garlic, and olive oil in large serving bowl. Add zucchini and onion, and toss to coat. Cover and marinate overnight, or up to 2 days. Sprinkle with feta, green onions, mint and parsley just before serving, as well as salt and pepper to taste.

This recipe is really pretty easy, but my kitchen is in no way equipped with fancy tools, and thinly slicing squash and zucchini into pretty ribbons turned out to be a bit more difficult than I would have liked. I tried using a simple vegetable peeler for one salad, which left me with a few pretty ribbons and a lot of messy globs. In the end, using a food processor to thinly slice the squash worked well.

From there, I marinated the squash, lemon juice and zest, olive oil, onion, and garlic overnight, then topped the dish with chopped mint, parsley, green onion, and feta right before serving. The salad was a complete hit.

Greek Squash Salad © 2012, Juniper Stokes

I love that this recipe uses raw zucchini. Though I don’t tend do well eating completely raw, I do try to eat 50-80% raw. The healthy enzymes and unaltered vitamin and minerals in raw foods are healing for our bodies on many levels. Though the feta means this salad is officially neither raw nor vegan, it still packs a super healthy punch. And the feta is just soooo goooood.

Inspired by my success with this recipe, I decided to take the flavors to Asia. Asian version coming soon!


Read Full Post »

Our tomato harvest this year has been our most successful ever. It’s our first year starting the plants from seed with our new greenhouse, and the results have been amazing.

tomato time © 2012, Juniper Stokes

And can I just give a shout out to heirlooms?  I love the rich color variations, ranging from “tomato” red (haha) to deep violet. And the sweet, true tomato flavor completely spoils me. I don’t know how I’ll go back to store bought this winter (yes, I do try to eat seasonally, but I just can’t go 6+ months without fresh tomatoes).

With all these beautiful tomatoes to play with, I’ve been busy experimenting in the kitchen this year. One of my favorite new recipes is a very simple cold tomato soup that allows the pure flavors of the tomatoes to shine. The soup is packed with healthy ingredients, naturally rich, and completely vegan. With a bit of attention to ingredients, this summer soup can easily be made raw.

Tomato Summer Soup

Ingredients:

  • about 6 medium-small tomatoes
  • 1/2 cup packed fresh basil
  • 1 clove garlic
  • 1 tsp agave*
  • 1/4 cup olive oil*
  • salt to taste

*Not all agave nectars and olive oils are raw, but raw versions are available. Try Xagave and Bariani olive oil.

Instructions:

The instructions are really pretty easy–put everything in a food processor and voila! I chop the tomatoes into fourths before blending, as well as the garlic. I recommend serving this soup in small bowls or cocktail glasses, as it really is rich.

tomato summer soup © 2012, Juniper Stokes

Variations:

I’ve also made this soup with a combination of basil and parsley, as well as extra garlic. With these ingredients, you can’t go wrong. A bit of parsley is delicious, and more garlic to taste only ups the health benefits.

For the raw foodies among you, I think this would make a great raw sauce for zucchini pasta.

Once again, enjoy!


Read Full Post »

In honor of the fall equinox today, I wanted to post a picture from this week’s harvest.

sugar pumpkins, mixed beans, heirloom tomatoes,  purple plums, fat carrots, yellow summer squash, and zucchini!      © 2012, Juniper Stokes

Well, a sampling of this week’s harvest. In reality the number of tomatoes and squash doubled this, and the photo doesn’t include all the fresh herbs we’re still getting!

Traditionally, fall, or autumnal, equinox marks a time to celebrate the transition of seasons. Day and night are of equal length, nature is in balance, and the time for harvest has arrived. Today is a day to give thanks for the seeds we have planted and the efforts we have given to them, as we transition into reaping the gifts of what we have sown.

I will certainly be celebrating as I create a few dishes from this year’s bounty. More recipes to follow!

Read Full Post »

I love fresh green beans. They are one of my favorite summer foods. And the green beans from our garden are top notch. I don’t know what the magic factor is, but I swear, there is something special about our garden’s green beans. Even my lizard (a bearded dragon who lived a long and happy life) would snub store-bought beans in favor of our home grown ones.

Maybe it’s all the love and good vibes we send to the garden . . . or maybe it’s the organic compost painstakingly collected all year. Whatever the reason, I’m very happy to be able to walk out the back door and eat fresh beans off the vine.

This year, we tried some tri-colored bush beans in addition to regular green beans:

purple, yellow, and green beans from the garden © 2012, Juniper Stokes

With beans this good, I find simpler is better for serving them. Here’s my favorite way to enjoy garden beans.

Perfectly Steamed Green Beans with Dill

  • 1-2 cups green beans (or tri-colored!)
  • 1/2 tsp dried dill
  • butter, salt, and pepper to taste*

*I use olive oil instead of butter to make a vegan version.

First, prepare the beans by washing them and trimming the ends. I like to leave the beans long, but but feel free to chop them into bite-sized pieces if you prefer. Next, bring a small amount of water to boil under a steamer insert in the bottom of a medium-sized pot. Once the water is boiling, turn the burner to medium heat and add the beans. Next sprinkle the dill over the beans to allow them to absorb the flavor as they cook.  For perfectly steamed beans, cook covered for 5 minutes, then remove the beans from the heat. The beans can continue to sit in the steamer for another 4-5 minutes without getting too mushy. Serve the beans with a dollop of butter and salt and pepper to taste. Enjoy!

Read Full Post »

Well, pumpkin blossoms, to be more accurate. This year our pumpkin plant is out of control. Its vines must run at least 16 feet along our garden fence, and everyday we see more beautiful bright orange blossoms opening and begging for attention.

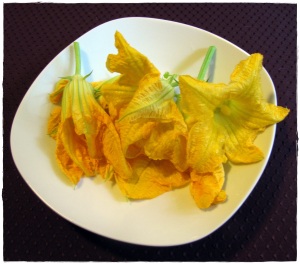
pumpkin blossom in the garden © 2012, Juniper Stokes

Eventually I noticed that only some of these blossoms were turning into actual pumpkins. I knew squash blossoms were edible, but hesitated to gather them for fear that I would be stealing one of the few blossoms that actually bore fruit. So, I did a bit of research. It turns out there are two types of blossoms on the same plant, male and female, and only the female blossoms bear fruit! So, how do you tell the difference? The female blossoms will already have a miniature version of the squash at their base. Check out pictures here:

Male and female squash blossom pictures.

I’ve also noticed that male blossoms tend to stick straight up along the vine, while females will more often aim downward.

Since learning to gather only male blossoms, I have been going squash blossom crazy this summer! I add them to sautés and soups, put them in quesadillas, steam them and serve lightly salted, and of course, stuff them. I have perfected my stuffed quash blossom recipe this summer, so here is the step-by-step to making amazing stuffed squash blossoms.

Ingredients

  • about 8 squash or pumpkin blossoms
  • 1 egg
  • 1 cup fresh mixed herbs, chopped
  • 3 oz goat cheese
  • 1/4 cup shredded mozzarella
  • 1 tablespoon olive oil

To be honest, I’m a very intuitive cook and never really measure anything. But if you stick to these basic ingredients and ratios, with a dose of your own intuition, you will end up with something delicious.

Gathering the Blossoms

Now that you know how to tell male from female blossoms, it’s time to gather them. Every few days we’ll have several blossoms blooming at once, and  I generally wait for one of these days to do my gathering. It’s best to pick the blossoms in the morning, when they are in full bloom, as they tend to wilt and close down later in the day. And, the blossoms only bloom for a day, so don’t expect to go back for the same blossom the next day. Also, make sure to leave a few blossoms for pollination–the girls do need a few boys!

To pick each blossom, simply cut the  stem an inch or so below the blossom. Wear gloves or a long sleeved shirt if you have sensitive skin, because squash and pumpkin plants are prickly.

Preparing the Blossoms

It’s easiest to prepare the blossoms immediately after picking them, when they are still open. They will close up after a few hours, which makes preparation more difficult, though still doable.

pumpkin blossoms immediately after picking © 2012, Juniper Stokes

pumpkin blossoms later in the day © 2012, Juniper Stokes

After gently washing the blossoms, reach in and pinch off the stamen. It’s fine to leave the stems on because they are completely edible, and are actually one of my favorite parts once cooked!

Making the Filling

To make the filling, first add the egg to your mixing bowl and stir with a fork to break the yoke.

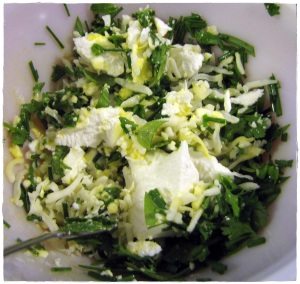
Next, stir in the chopped herbs. I’ve tried all different combinations here, usually some variation of chives, basil, parsley, and tarragon, and every time has been delicious. My favorite by a margin though was 2/3 cup chives and 1/3 cup tarragon. Amazing.

Now stir in the cheese. I like to use coarsely chopped goat cheese and mozzarella, though feel free to experiment with your own favorites.

Once all the ingredients are mixed, the filling should have a thick, malleable consistency.

the filling © 2012, Juniper Stokes

Stuffing the Blossoms

Now for the fun part. First, prepare a baking dish by placing a small amount of olive oil in the bottom. You will gently coat the blossoms in olive oil as you add them to the dish. Next, preheat the oven to 350 degrees.

Take the first blossom and gently open its petals. you can use a spoon to scoop in the filling, but I find it’s easier just to get messy and use my fingers. I grab a small bit and gently press it into the blossom until it’s almost full, then gently close the petals again, pinching them together at the top.

Once the blossom is stuffed, roll it in the olive oil and line it up in the baking dish.

Baking

Once the blossoms are ready, bake at 350 degrees for 15-20 minutes. You’ll want the filling to cook, but the blossoms to retain their delicate taste, so make sure to take them out before the blossoms turn brown.

YUM © 2012, Juniper Stokes

Now you’re ready to serve. Enjoy!

Read Full Post »